
My plants keep dying, I don't water them as much as I should.
So instead of being a normal human being and keeping to a schedule of watering my plants (or literally just looking at the plant to see if it needs watering), I'll spend an inordinate amount of time creating a system to remind me to water my plants, as well as keeping me posted on telemetry that I don't especially care about. …
Moving on... I've been wanting to learn Redux for a while now but never really had a oppurtunity to do so, simply because the applications I make are often small and I never seem to come across the whole "state bubbling" problem that a lot of people quote as their reason to integrate Redux.
I'm well aware this project could've been done without Redux, but I figure starting small is a way better to learn the concepts that can be used for bigger things later on.
Redux, explained
The problem with component state comes along when the component tree becomes complex and state cannot be easily fetched nor passed down through the component tree.
As far as I understand it Redux is simply a state manager, Redux contains a store which is like a global state - a single source of truth for all components to read from, but places specific restrictions on what and how they update the state of the store.
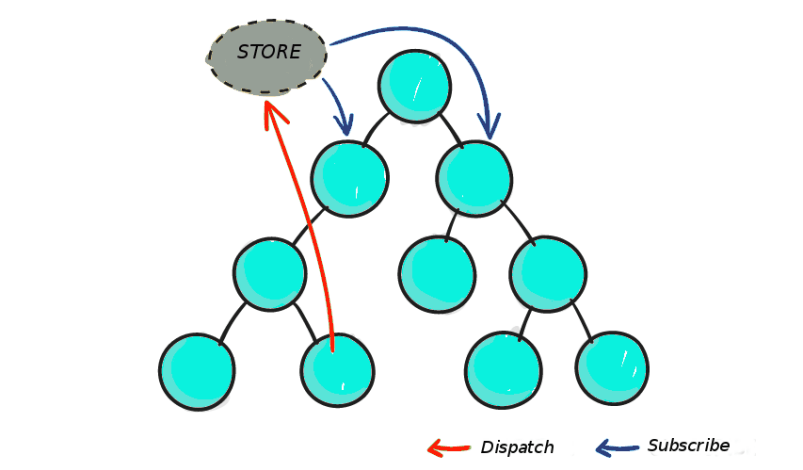
From https://blog.logrocket.com/when-and-when-not-to-use-redux-41807f29a7fb/:
This complexity is difficult to handle as we're mixing two concepts that are very hard for the human mind to reason about: mutation and asynchronicity. I call them Mentos and Coke. Both can be great in separation, but together they create a mess.
Redux tries to simplify this issue by removing asynchronicity and direct DOM manipulation, but the overall state of the application is still within our control.
Lifecycle
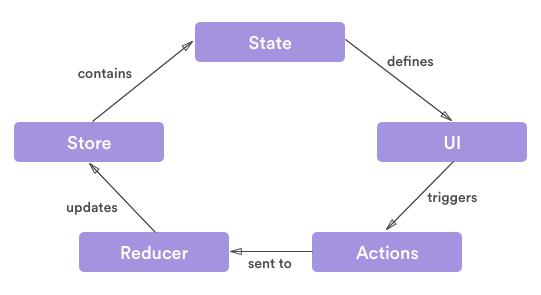
Actions
Actions are simply events that send data from the application to the store. Data
can be sent in different ways, i.e. from an API or user event. Actions carry a
type and a payload. Actions are dispatched from the app which then change
the internal state of the store.
An action example which fetches a list of plants from an API.
export const fetchPlants = () => (dispatch) => {
  //=> dispatch => returns a func that takes args(dispatch)
  //dispatch makes async requests
  //think of as a resolver in promises
  fetch("/plants/")
    .then((res) => res.json())
    //dispatch data (plants) to reducer
    .then((data) =>
      dispatch({
        type: FETCH_PLANTS,
        payload: data.data,
      })
    );
};
data.data is firstly the response in json, and the second data field is the
mixed type object containing the API response data.
"data": [
  {
    "plant_name": "desk_plant",
    "date_added": 152740230,
    "updates": [...]
  },
  {...}
]
The action has a type of FETCH_PLANTS which is then processed by a Reducer
which decides how the state of the store should change depending on the
payload.
Reducers
An action doesn't actually change the state of the store itself, only the intent to do so, reducers are the functions that read in the current state and then return a new state, which in turn updates the UI. A reducer can take many different types of actions specific to a certain part of an application.
Reducers can be combined using Redux's combineReducers() into a root
reducer, which is basically one huge reducer that handles the applications
store.
Following from the FETCH_PLANTS action...
const initialState = {
  //represents plants from action, where we put he fetch req
  items: [],
};

export default function (state = initialState, action) {
  switch (action.type) {
    case FETCH_PLANTS:
      // the initial state (items = [])
      return {
        ...state,
        items: action.payload,
      };
    default:
      return state;
  }
}
Reducers are pure functions, they make no API calls and their return values should depend solely on its parameters.
Store
As mentioned before, the store is a single source of truth, in order for components to read the store we need to connect them to it.
In a component that lists all the current plants in the store items we would
typically export it like:
export default PlantList;But this is unconnected, and has no way of reading the store, instead we use
Redux's connect function to allow this to happen.
export default connect(MapStateToProps, { fetchPlants })(PlantList);When the FETCH_PLANTS action is called it dispatches an event to the reducer
which returns a new state, upon this we map the current state to the component
props via MapStateToProps.
const MapStateToProps = (state) => ({
  //root reducer returns plants
  //PlantReducer has state with items
  plants: state.plants.items,
  //now have this.props.plants
});
Now this all doesn't seem very useful on its own, but add in more actions like
CREATE_PLANT, DELETE_PLANT and others and it scales up quite nicely, s-so
they say...
Hardware + code
First of all we need to know what kind of data we are going to collect. I settled on one data point: the moisture level of the plant, but this could be expanded later on to include humidity, light level, temperature and so forth.
I choose to use a RPi Zero W since its easy to set up, has a bunch of nice protocols (I2C, SPI) to interact with hardware and can actually talk to the API (more on that...).
I choose this moisture sensor because:
- capacitative, resistive sensors suffer in accuracy and have exposed metal (which will corrode)
- on-board ATSAMD10 uses I2C communication, very simple to interface with as opposed to a resistive input transducer where I'd have to convert the analog signal via an ADC
- longer life, no exposed metal so no corrosion
- gives a nice output value of 200 (very dry) to 2000 (very wet), makes my life easier later on :)
To turn on I2C we can just navigate through the raspi-config menu an activate
it.
Checking if it's working...
pi@raspberrypi:~/$ i2cdetect -y 1
     0  1  2  3  4  5  6  7  8  9  a  b  c  d  e  f
00:          -- -- -- -- -- -- -- -- -- -- -- -- --
10: -- -- -- -- -- -- -- -- -- -- -- -- -- -- -- --
20: -- -- -- -- -- -- -- -- -- -- -- -- -- -- -- --
30: -- -- -- -- -- -- -- -- -- -- -- -- -- -- -- --
40: -- -- -- -- -- -- -- -- -- -- -- -- -- -- -- --
50: -- -- -- -- -- -- -- -- -- -- -- -- -- -- -- --
60: 60 -- -- -- -- -- -- -- -- -- -- -- -- -- -- --
70: -- -- -- -- -- -- -- --
Nice., onto the code.
When a plant is created using the API it will return a UUID for the plant, this
UUID is stored in a secrets.json file, which also has the auth token for
making PUT requests to the API:
The sensor has an I2C address of 0x36. I wrote a little bit of code to talk to
our API every 30 minutes and send the moisture/temperature level. UUID is used
to let the API know which plant is being updated.
{
  "TOKEN": "API token",
  "UUID": "Plant UUID"
}
#!/usr/bin/env python3
import os
import time
import json
import busio
import requests
from board import SCL, SDA
from adafruit_seesaw.seesaw import Seesaw
with open("secrets.json", "r") as f:
SECRETS = json.load(f)
HEADERS = {
"Auth-Token": SECRETS["TOKEN"],
'Content-Type': 'application/json'
}
URL = "https://moisture-track.herokuapp.com/plants/"+SECRETS["UUID"]
print(SECRETS)
i2c_bus = busio.I2C(SCL, SDA)
ss = Seesaw(i2c_bus, addr=0x36)
while True:
# read moisture level through capacitive touch pad
moist = ss.moisture_read()
temp = ss.get_temp()
# send moisture update to the api
payload = {
"moisture_level": str(moist),
"temperature": str(round(temp, 1))
}
print(json.dumps(payload))
r = requests.put(URL, data=json.dumps(payload), headers=HEADERS)
print(r.content)
#repeat once every 30 minutes
time.sleep(1800)In order to get this to work on the RPi upon boot, we can use the
/etc/rc.local file to designate scripts that should be stated on boot. Since
all scripts in rc.local are executed as root, we need to install the python
packages for the root user.
sudo su
apt-get install python3 python3-pip
pip3 install adafruit-blinka adafruit adafruit-circuitpython-seesaw

cd /home/pi
vi start.sh
  #!/bin/bash
  cd /home/pi
  echo "Starting moisture.track"
  cd moisture.track...
  git pull origin master
  cd hardware
  python3 main.py &
  exit 0

chmod +x start.sh
vi /etc/rc.local
./home/pi/start.sh
sudo reboot
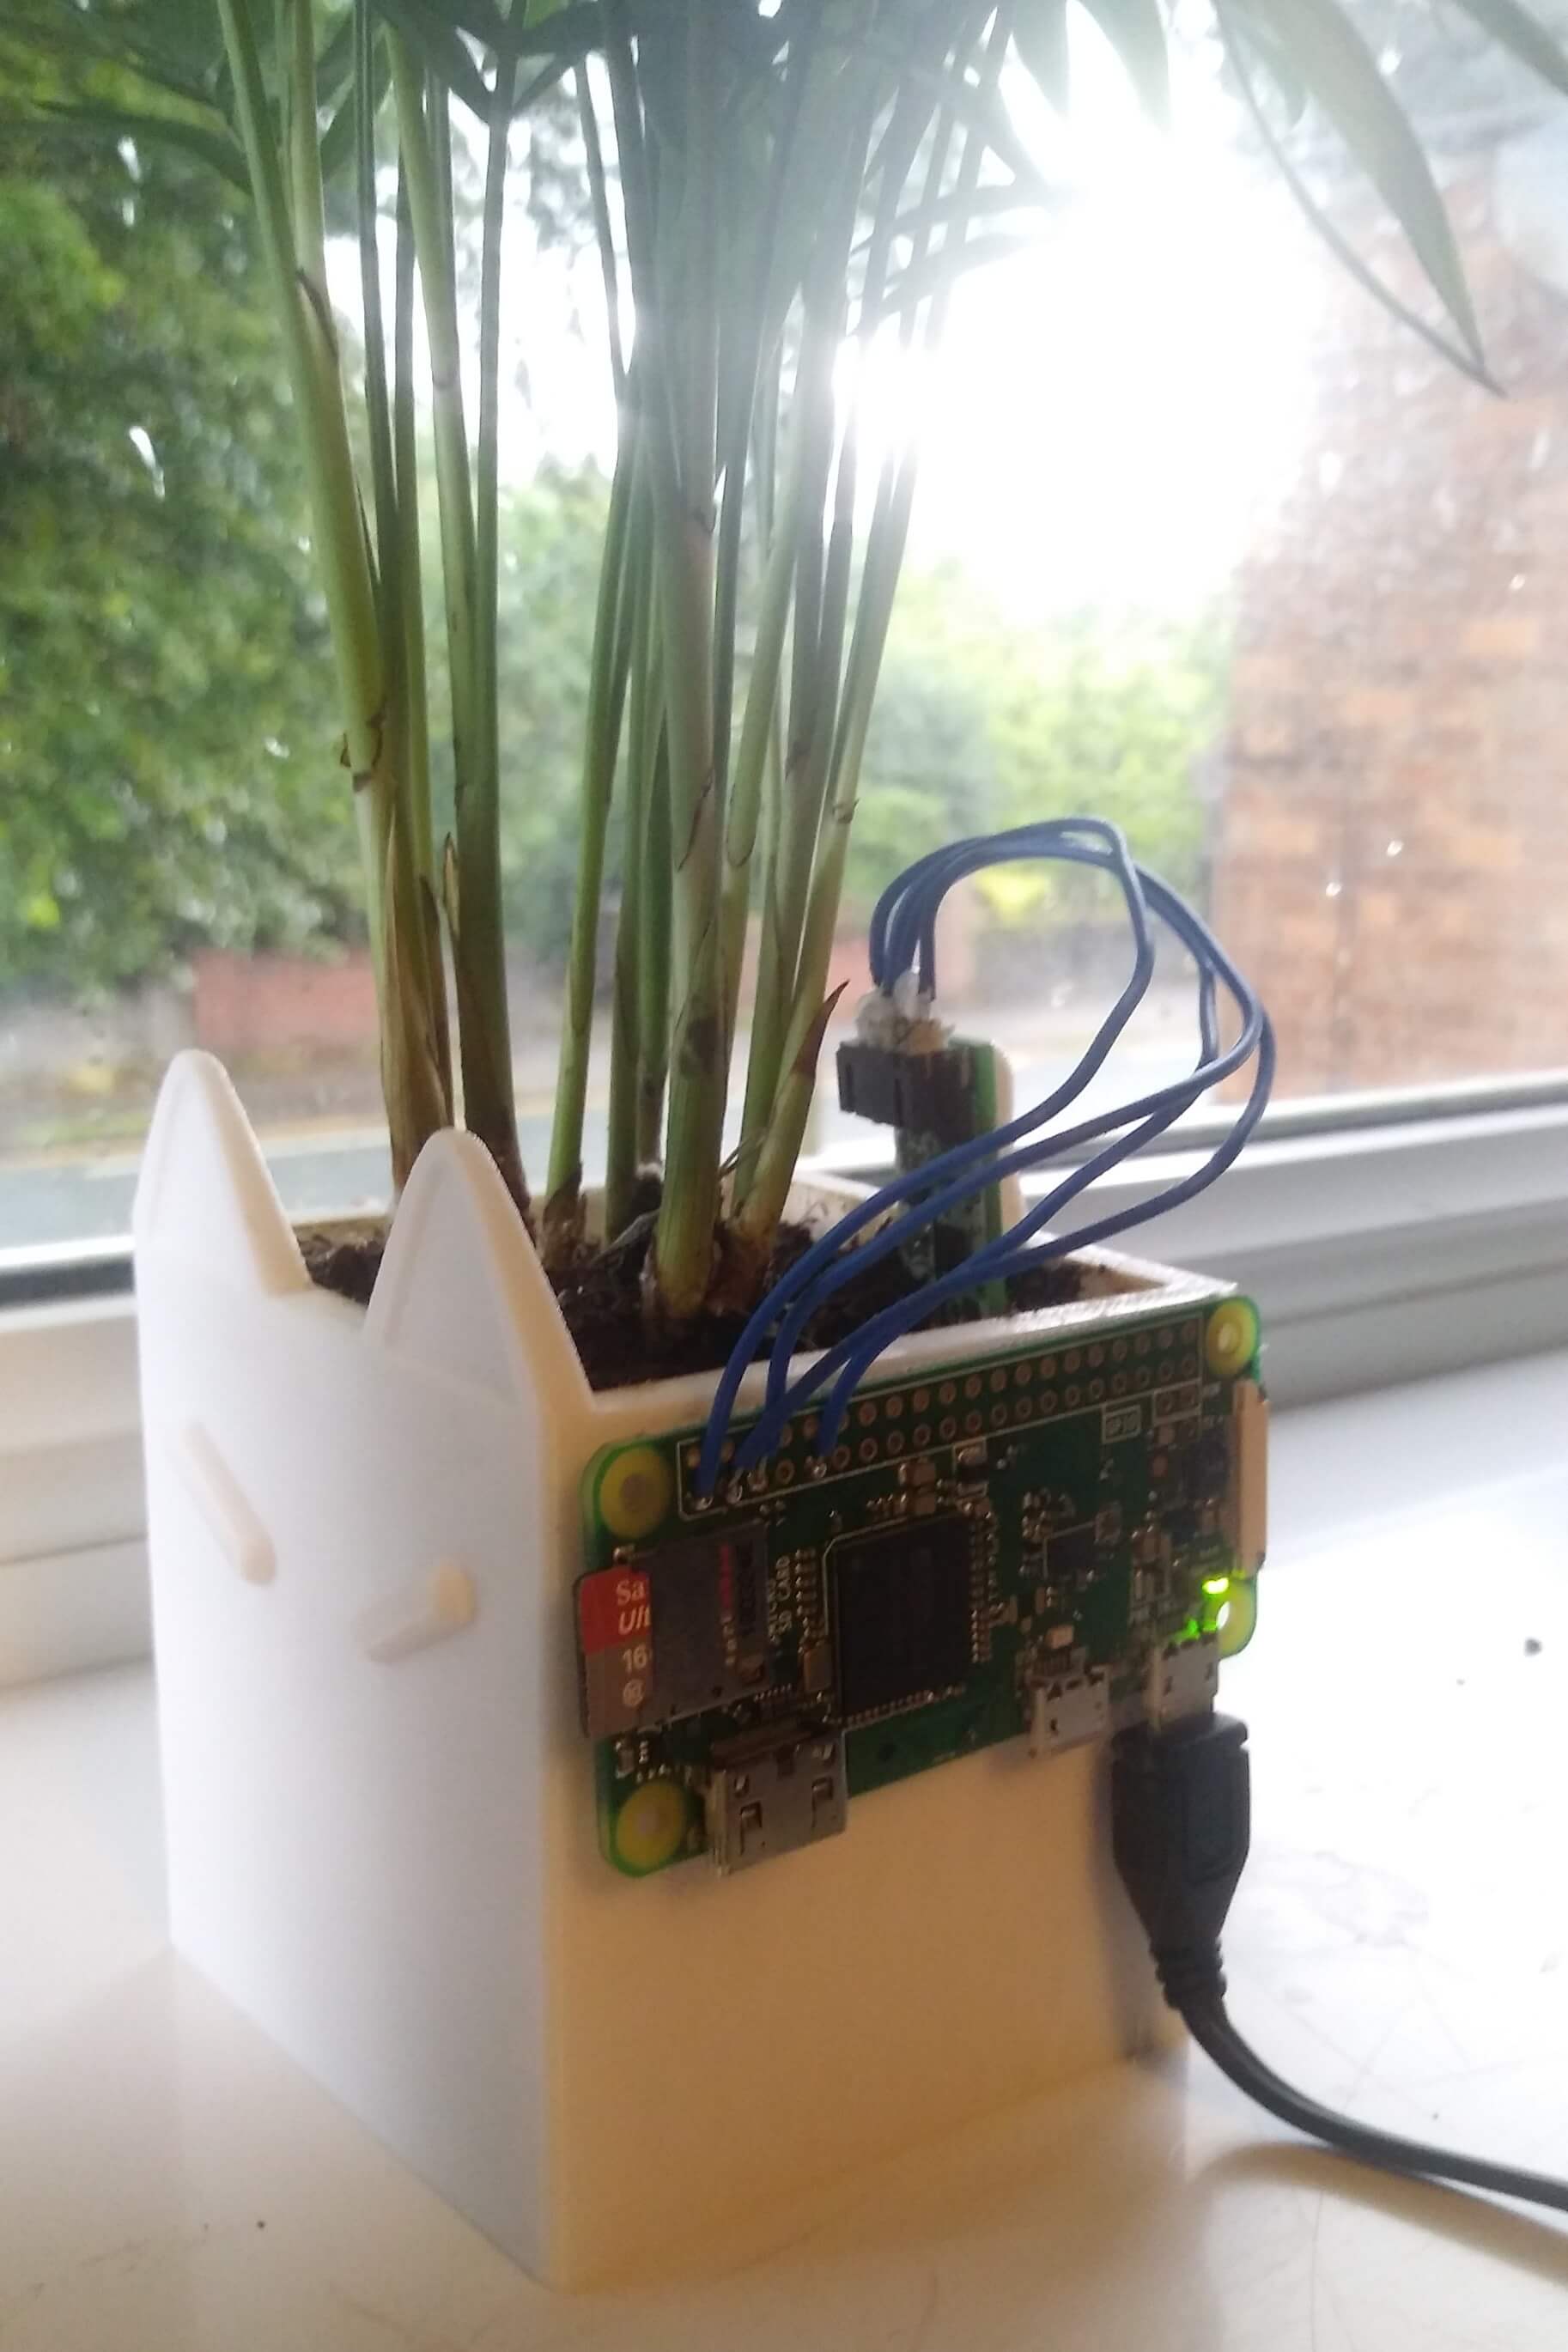
And finally to wire it all up:
Flask API
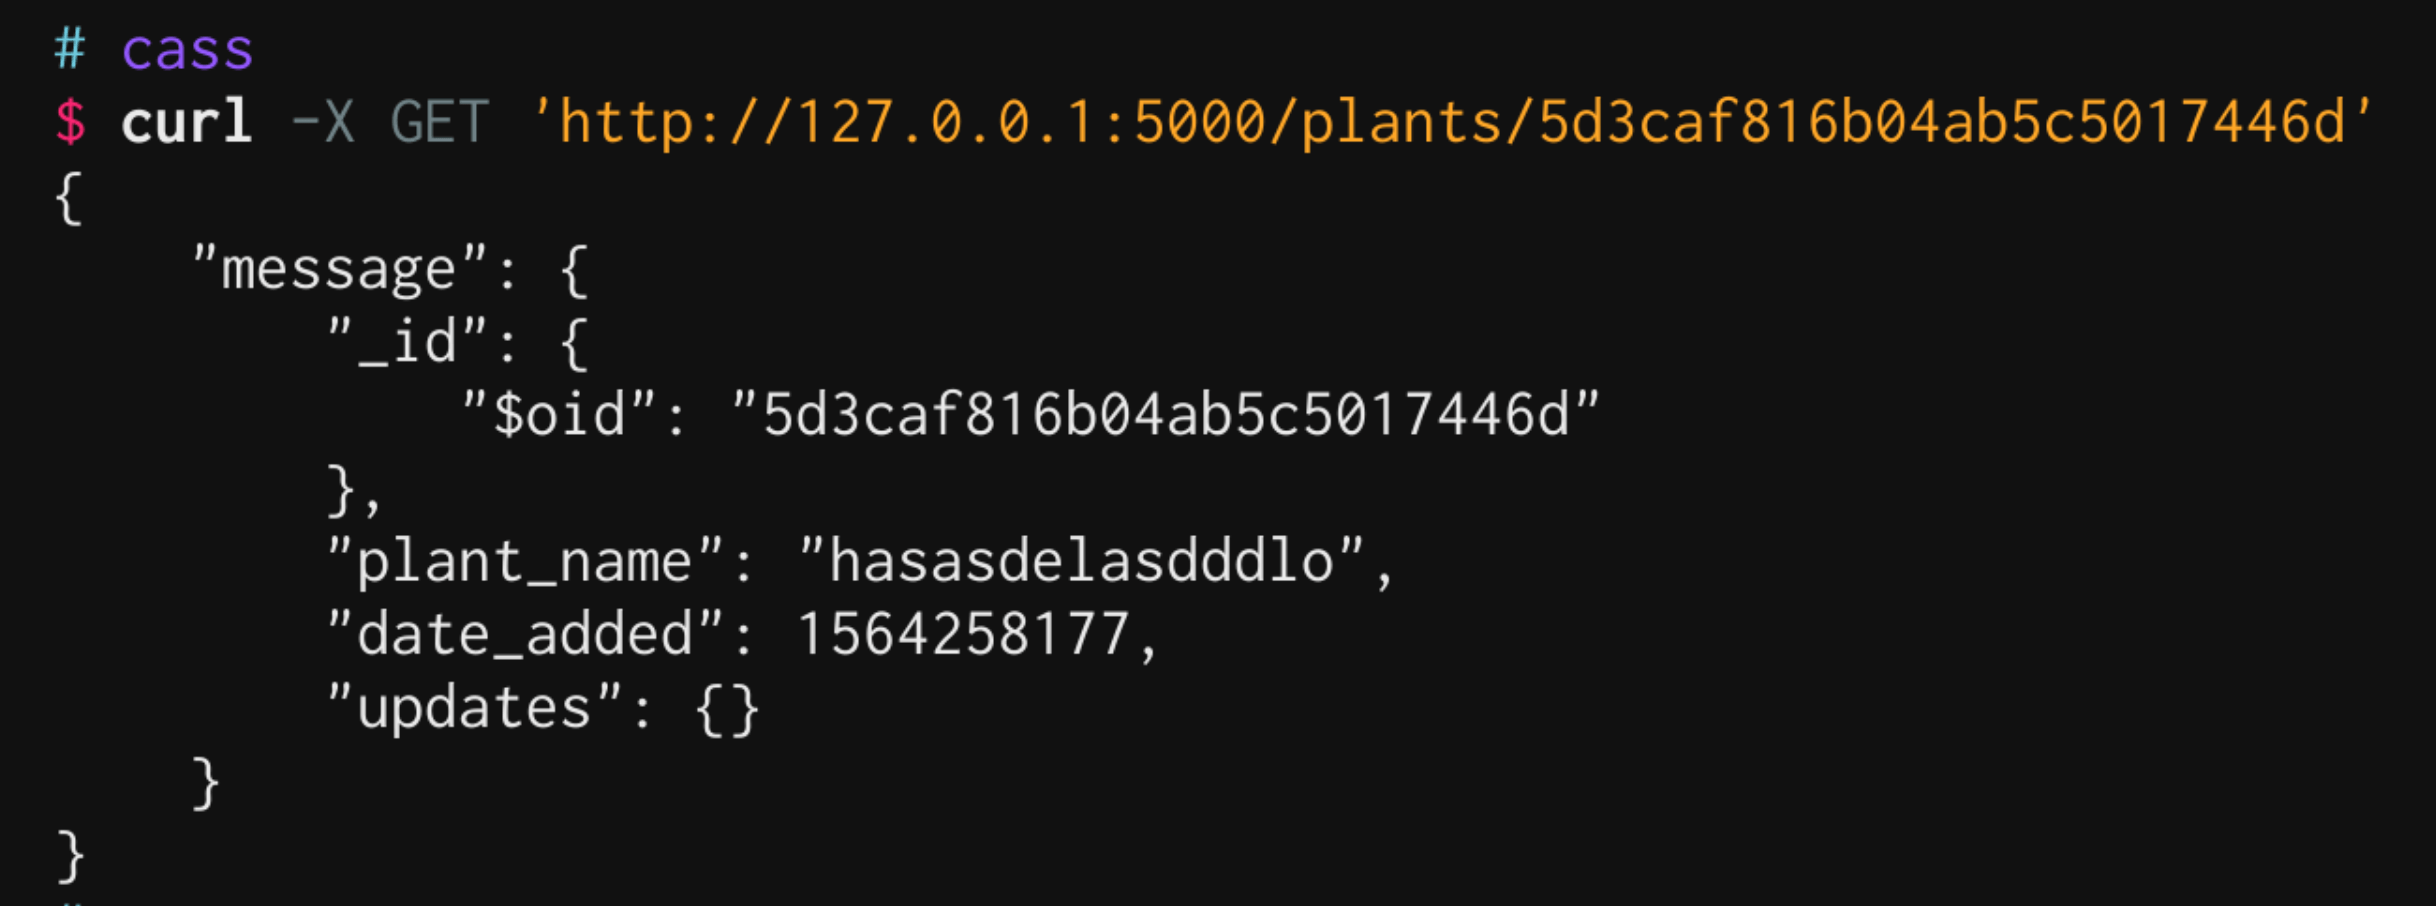
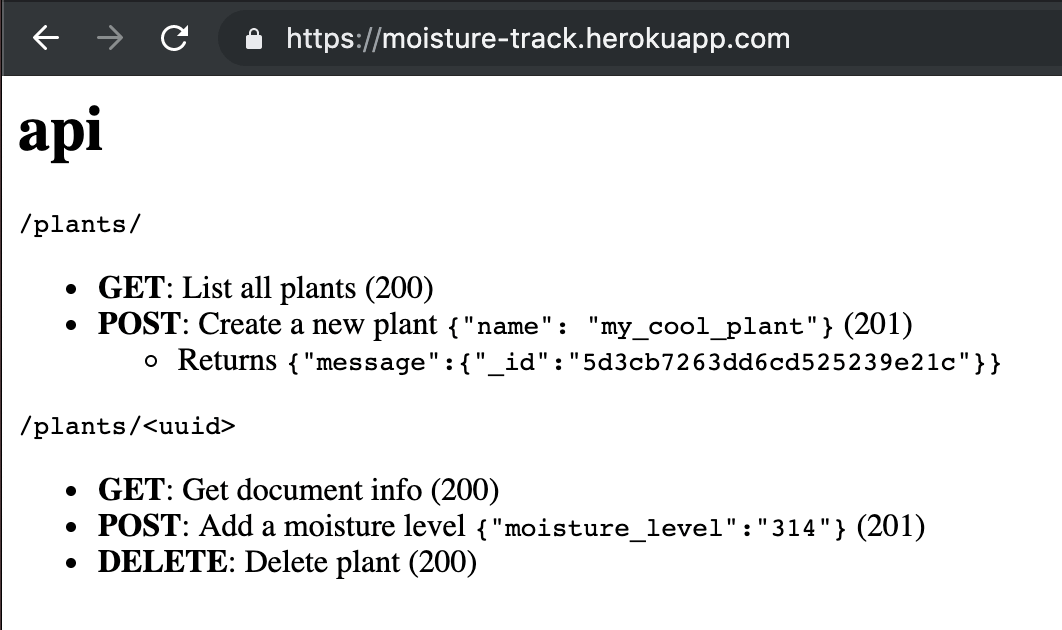
The API I wrote uses a MongoDB collection to store plants and their moisture levels. API respones will be enveloped - some people say this is bad practice and that all other data required should be in the headers, but for the sake of flexibility in the future I'm going with it.
{
  "data": "Mixed type response with result",
  "message": "Description of what just happened (if neccessary)"
}
Endpoints that modify data (POST, PUT, DELETE) should have a TOKEN
header which is authenticated against a private token, this allows me to push
this whole thing live and not have random people delete my plants, which would
be quite bad :(
There are two endpoints, /plants and /plants/<uuid>.
/plants
/plants has a GET and POST method.
GET200 (OK)
Returns a list of all plants.
POST201 (Created)
Creates a new plant, takes input for the plant_name and image_url (for the
front-end later on) in the form of a json document.
{
  "name": "desk_plant",
  "image_url": "https://imgur.com/ahgjasd.png"
}
Returns the plant UUID.
{
  "data": {
    "_id": "5d3dfaa9a60c48701385be48"
  }
}
/plants/<uuid>
/plants/<uuid> has GET, PUT and DELETE methods.
GET200 (OK)
Returns the plant object with UUID <uuid>.
PUT200 (OK)
Updates the plant updates object which contains all moisture levels in the
form:
"updates": [
  1564401779: 1320,
  1564398179: 1200,
  ...
]
With the time-stamp being the UNIX epoch.
Takes input in the form of a json document:
{
  "moisture_level": <int:value>
}DELETE200 (OK)
Deletes the plant with UUID <uuid>.
React+Redux front-end
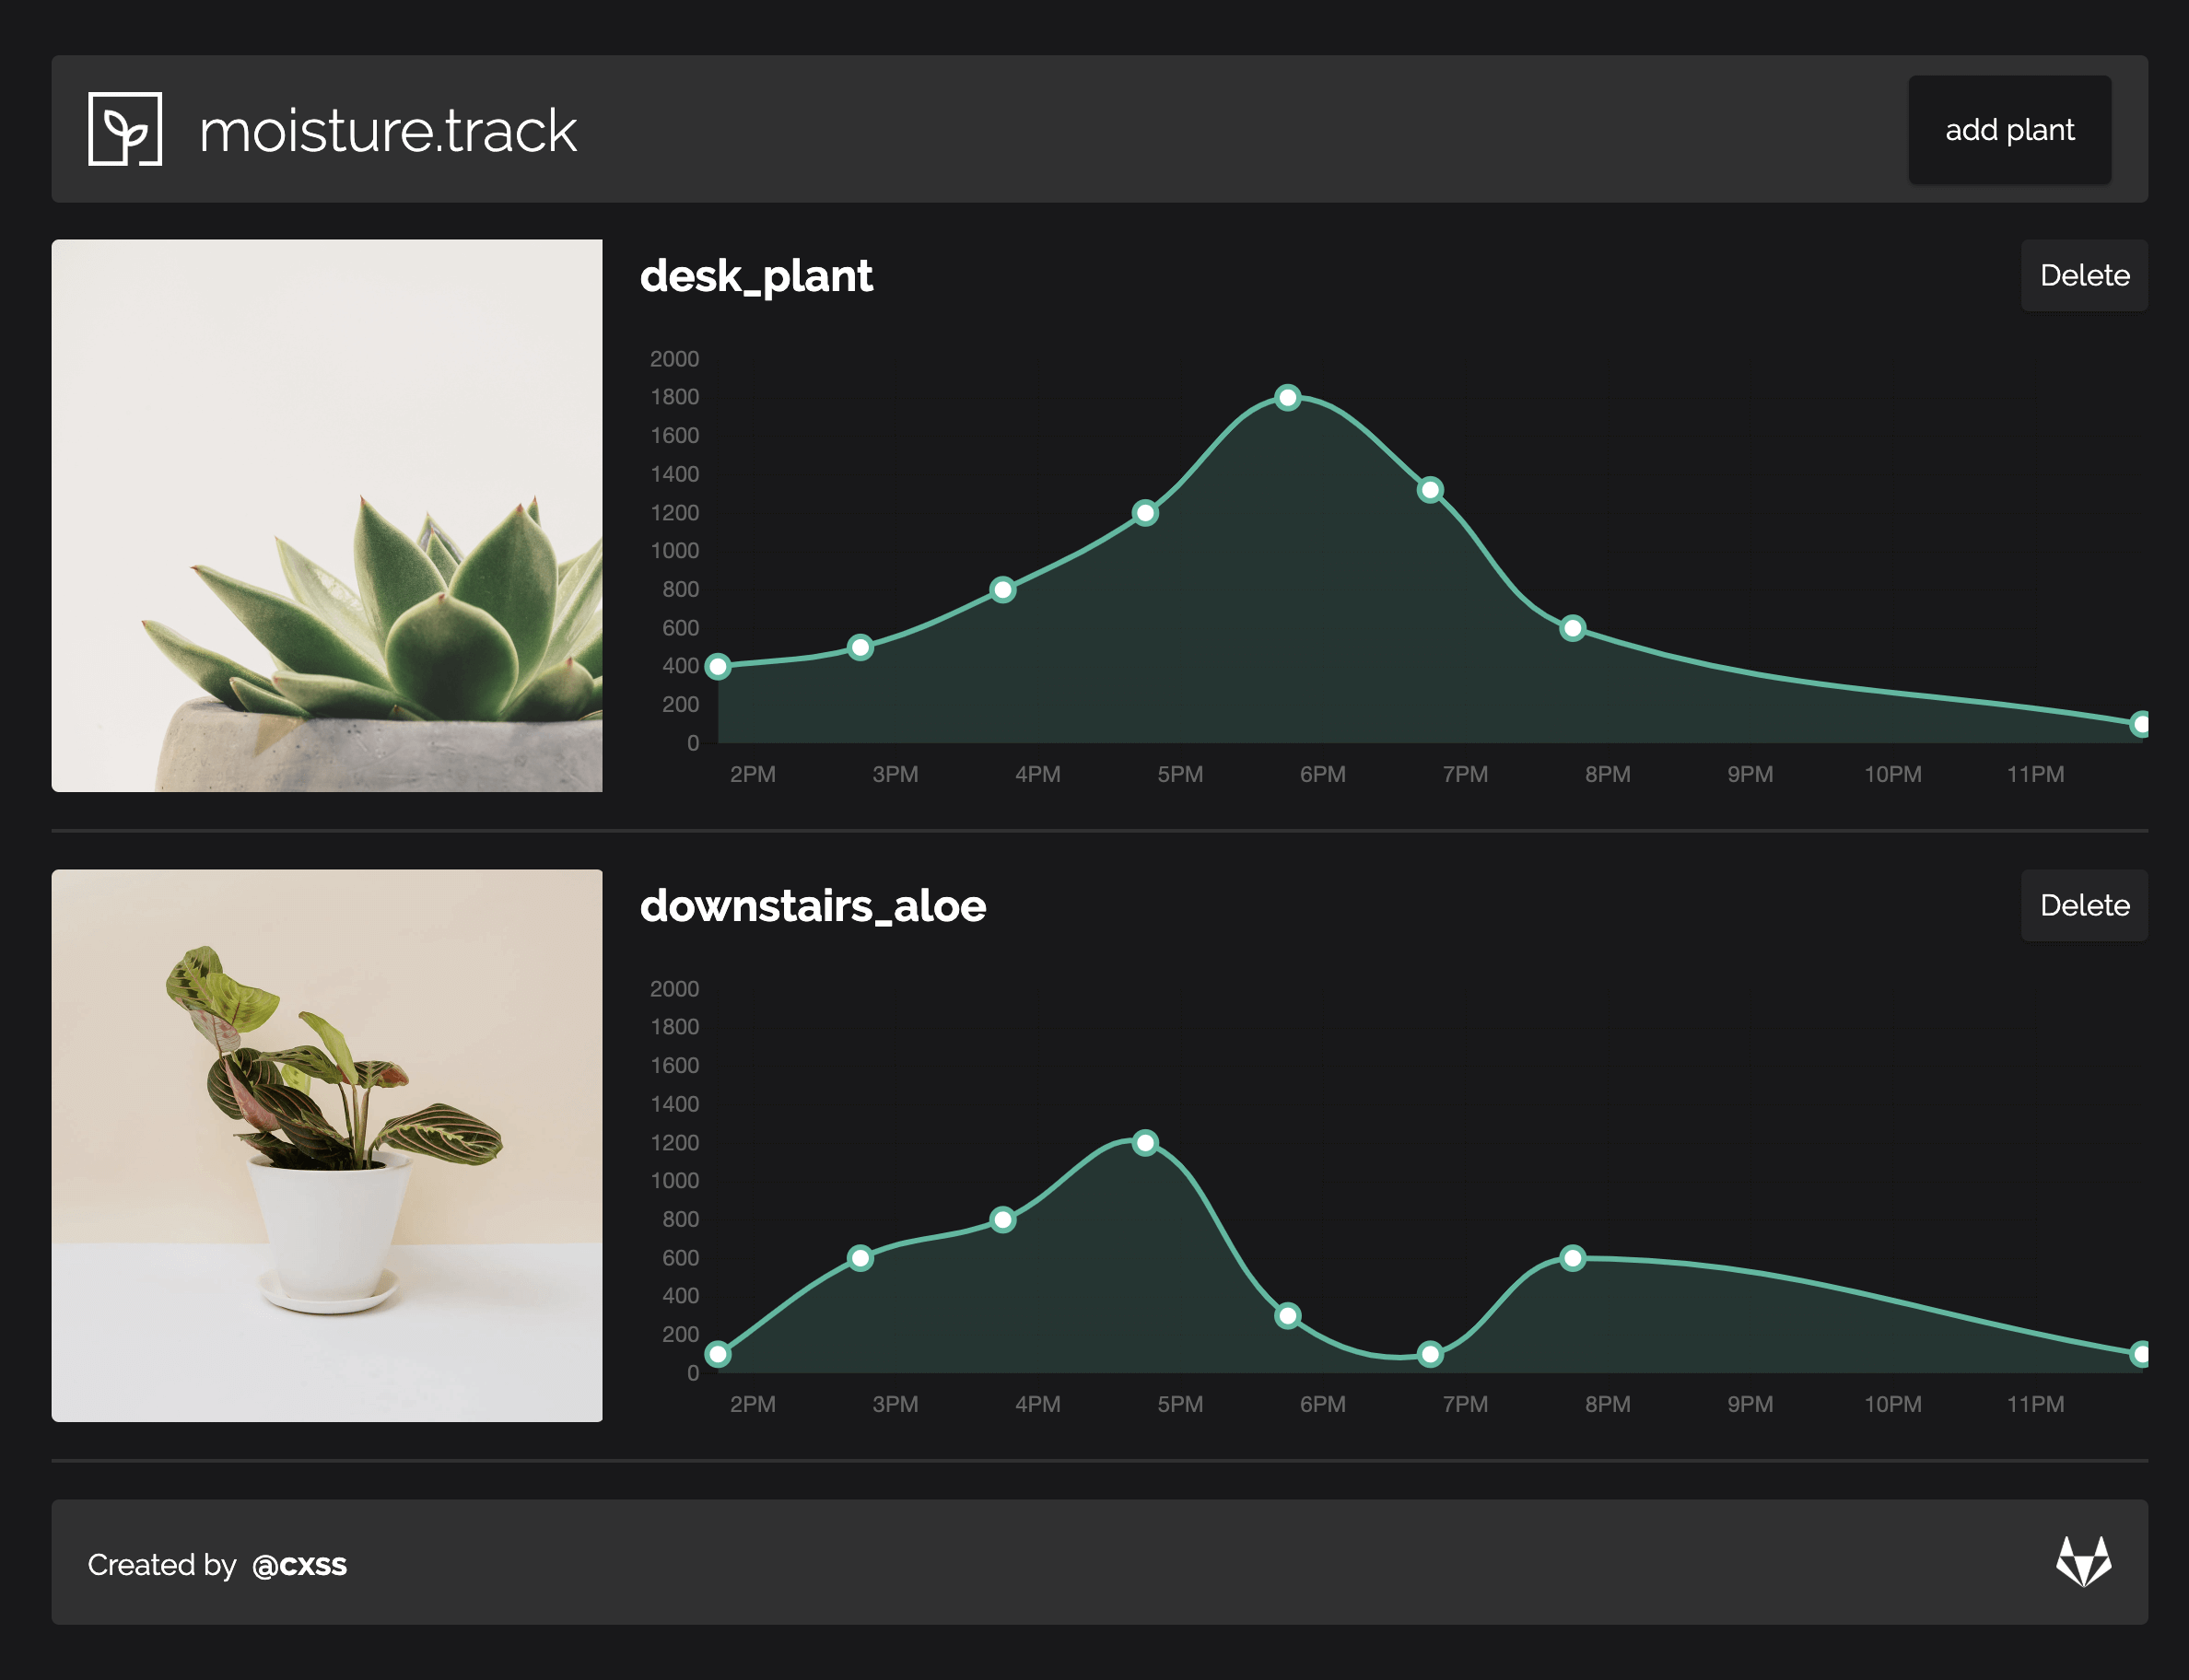
A fairly """simple""" application in terms of Redux, data is presented via chart.js and I used the chart.js React wrapper.
The application uses Redux to send actions which request part of the API, initially to get a list of plants, and then later to maybe delete/add new plants.
Site is live at: https://moisture-track-fe.herokuapp.com/
Deployment
I've created two Heroku applications, one for the api and another for the
front-end: moisture-track and moisture-track-fe.
GitLab Continous Deployment
I like to have everything just deploy when I send a push request, this can be achieved through the use of GitLabs runners.
Since I've not written any tests, I'll just go straight to production (hey I'm doing enough work as it is here!).
Make a .gitlab-ci.yml.
I use dpl to send a deployment request to Heroku, send a request for the api
and front-end, easy.
production:
  type: deploy
  script:
    - gem install dpl
    - cd api
    - dpl --provider=heroku --app=moisture-track --api-key=$HEROKU_API_KEY
    - cd ..
    - cd frontend
    - dpl --provider=heroku --app=moisture-track-fe --api-key=$HEROKU_API_KEY
Heroku, Flask
I always seem to have trouble with Heroku, maybe I'm just an idiot but there are a few things and gotchas that you need that aren't really explained in once place, you always have to spend an hour jumping around different docs for what to do.
For Flask, this is what you need.
- Buildpack: add the
heroku/pythonbuildpack to your application - Pipfile: Make sure all your dependencies are installed via
pipenv - Procfile: This is read by Heroku to know what to do to deploy your app
envvariables: e.g.MONGO_URI, this is private of course as we don't want random people accessing it.
Since Flask doesn't have a production web server you can't just do flask run
to deploy it online, instead you must use something else, I use gunicorn
simply because it's the first one I found and got working.
Add it to your Pipfile via pipenv --three install gunicorn.
Then in the Procfile add this one line: web: gunicorn app:app, web being the
worker that Heroku spawns (which is by default web), gunicorn being the
web-server and app:app being firstly: the name of the service (which could be
anything besides app), and secondly the Flask app, e.g.
app = Flask(__name__) in the app.py / whatever.py.
Normally you would use .env to store enviroment variables, but for some reason
when calling os.environ.get() for the value Heroku just doesn't like it.
Instead you can use Heroku's Config Vars which functionally work exactly the
same.

And can be called in the same fashion of os.environ.get(MONGO_URI).
Local testing
To test the API works with Heroku locally you need to first run it in a python
virtual enviroment (so all the dependencies are available), then run
pipenv run heroku local.
Deploying React
Fortunately there's a nice buildpack that someone created to deploy react apps using Nginx on Heroku, https://github.com/mars/create-react-app-buildpack.
There's a tiny bit of configuration to setup to get the url proxying to work
correctly however. So for example, in React when I request /plants/ it gets
proxied to the Flask backend: https://moisture-track.herokuapp.com/plants/.
Unfortunately the documentation for this buildpack is a bit out of date, as of
React 2 you cannot supply an object to the proxy key in package.json, only
strings are allowed. Instead we must use a setupProxy.js file, which
essentially does the same thing.
-
package.json- Remove
proxykey + value
- Remove
-
src/setupProxy.js- For local development proxying to work, add this file to proxy all
/api/routes to the local Flask address.
- For local development proxying to work, add this file to proxy all
const proxy = require("http-proxy-middleware");

var options = {
  target: "http://localhost:5000/",
  pathRewrite: {
    "^/api": "/", // rewrite path
  },
};

module.exports = function (app) {
  app.use("/api", proxy(options));
};static.json- For production, add the following to
static.jsonin the file root, keepingAPI_URL, we'll use that later in the Heroku config vars to reference the API address..
- For production, add the following to
{
  "root": "build/",
  "routes": {
    "/**": "index.html"
  },
  "proxies": {
    "/api/": {
      "origin": "${API_URL}"
    }
  }
}
All routes requested in the React app must be changed from e.g.
fetch("/plants/") to fetch("/api/plants/").
Finally in the React Heroku app add a config var with key API_URL and a value
of the live Flask API address.
Pushing a new commit with everything done results in the API working, except from the database side of things...
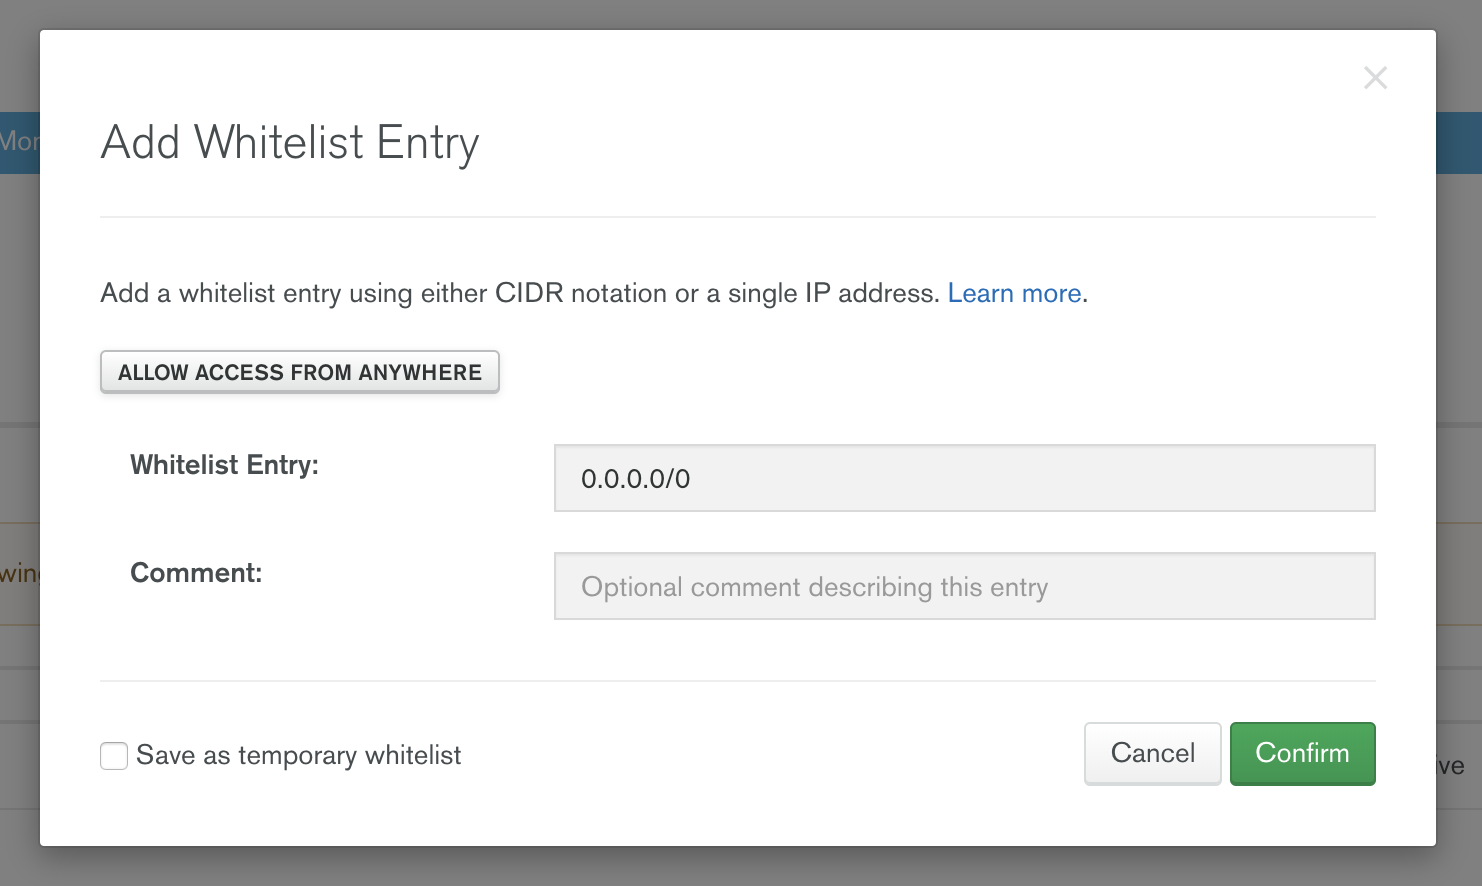
For MongoDB Atlas to work from anywhere the IP blacklists should be changed,
this is as simple as going to Atlas, clicking Network Access and adding a new
IP address.
Conclusion
As you can see this was a fairly involved and full-stack project, all the way down to making the hardware :) I had fun learning Redux, I found the following resources pretty helpful:
- https://www.youtube.com/watch?v=4T5Gnrmzjak&t=357s
- https://www.youtube.com/watch?v=93p3LxR9xfM&t=2107s
- https://www.youtube.com/watch?v=4o7C4JMGLe4&t=409s
- https://www.youtube.com/watch?v=3ZS7LEH_XBg&t=719s
- https://blog.logrocket.com/when-and-when-not-to-use-redux-41807f29a7fb/
I guess now I have no excuse for my plants dying in the future.
