
Its been a couple of years since I made my post on using JAMstack to make a sort of file hosting service using Netlify, since then I've made mostly small modifications - re-wrote the auth to use GitLab and had two instances of it running at ftp.cass.si & cass.si/ftp.
And after those two years I have come to a conclusion:
It kind of sucks.
Standing out to me are a few major issues and just generally shoddy programming out of incompetence at the time. But hey! Years have passed and I'm an infinitely better programmer† now, and as a better programmer I shall rectify this thing into a better thing :)
The main glaring issues with the current implementation:
- Using GitLab Access Token as a form of authentication only allows one user to access the service
- Site UI lacking
- Managing files is super time consuming
- Uploading multiple files results in mutlitple commits being made
- Files are roughly 1/3 larger due to blob -> Data URI conversion
- .b64 files don't contain any sort of meta-data like creation date, uploader name etc.
- Code is callback hell incarnate
After spending all of an hour thinking about possible improvements, I came up with these solutions:
- Use Netlify Identities®™ to allow multiple users to access the service and store GitLab API tokens
- Use Harp.js to pre-render a site skeleton into which we load API-grabbed stuff
- Use action hashes with this route to send all files in one commit
- Use an external image compression service to make files smaller before converting
- Package files into yaml and include some metadata like creation time & who uploaded it
- Use async/await
The result:
Pretty cool hey?
What even is JAMstack?
I never actually explained this in the previous post - that's because in 2017 I didn't even know the word existed, and the JAMstack community was in it's infancy. So let's take a little time to understand what it is.
JAM means JavaScript, APIs and Markup - a bit inspecific right? Basically there's no server involved, sites are pre-compiled via a continous deployment pipeline (Netlify, ZEIT Now) into static content by a generator (Gatsby, Jekyll... Harp) and served to the end user via a CDN.
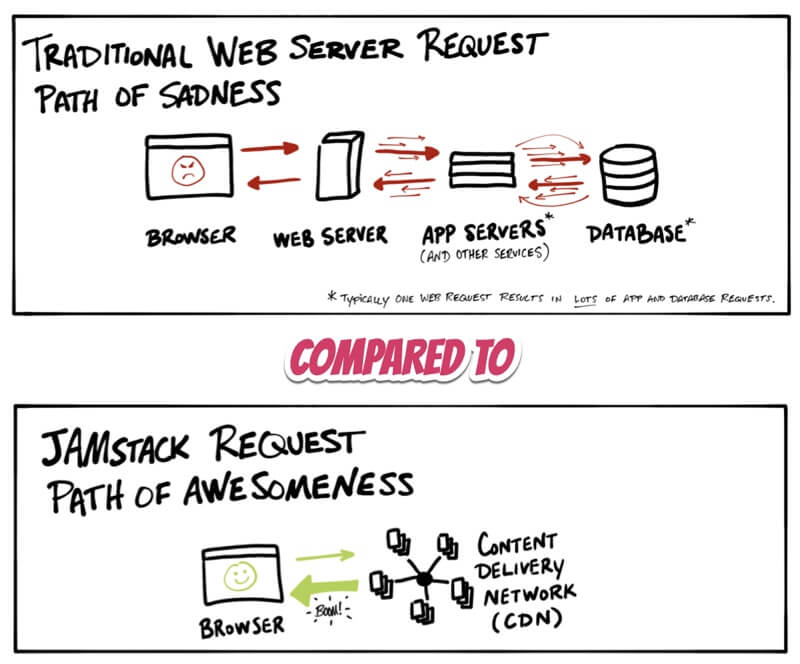
Now you might just be thinking: "Cass, what's the big deal with just spinning up some static html, we did that that 10 years ago" - and yes, that's sort of true, but misses out the A part of this whole thing, re-usable APIs that can be accessed over https with JS opens up a world of possibilities - you no longer require a monolithic server on some VPS to handle complex operations and dynamic content (...like authentification).
There are currently a tonne of applications for JAMstack sites, from blogs to , heck even things like SnipCart exist for making e-commerce sites! There's a nice book on JAMstack here.
Why JAMstack?
- Better performance, sending static pre-made html files is fast as fuq compared to a server generating html on the fly.
- Higher security, reduced attack surface, can't really do any SQL injections or XSS scripting if what you're serving is static.
- Cheaper, scaliability: When your deployment is simply a stack of files, with more demand the CDN simply picks up the slack like nothing ever happened
- Easier development: Loose coupling and separation of controls allow for more targeted development and debugging.
Those are just some generic reasons I peeled off the interwebs(*) - but here's a small anecdote from when I was interviewing at a small web dev. firm.
They brought me in for some test day, learning their stack and whatnot. They weren't really doing anything that involved, mostly just websites for buisnesses with a CMS. And wow, let me tell you, that stack was a giant pile of shit. I wish I was joking - for the entire 3 hours I was there every second was pain, I genuinely felt like I was in a time capsule from 10 years ago the way it was all set up.
Their stack consisted of some buggy in-browser text-editor/CMS all mashed into one, you couldn't edit more than one file at a time, no version control, no macros/multicursor/simple keybindings, it took 4 seconds to save a change, and then another 5 to propogate the change into a live preview.
All their templates are built using some strange templating system in a language called XSLT, which wikipedia describes as "a language for transforming XML documents into other XML documents", so that's fun. There's also no watcher for compiling SASS to CSS making the entire "SASS is required" part of the job application form pointless, I was literally copy-pasting CSS from Sassmeister into the CSS files the whole time. Interestingly the lead dev. agreed with me on a few of these issues on the code review.
After I'd gone home I started thinking about how their entire system could be replaced with a Forestry.io & Gatsby/Jekyll/whatever set-up in under a day and be leagues better than what they currently had - that just really brought home how powerful JAMstack truly is. Part of me wishes I'd brought home the point a bit more about how bad it all was - but understandably they had something that worked... and just never seemed to want to change.
Anyway, onwards with development!
Architecture
Here's a flow-chart of what goes down when the user uploads a file.
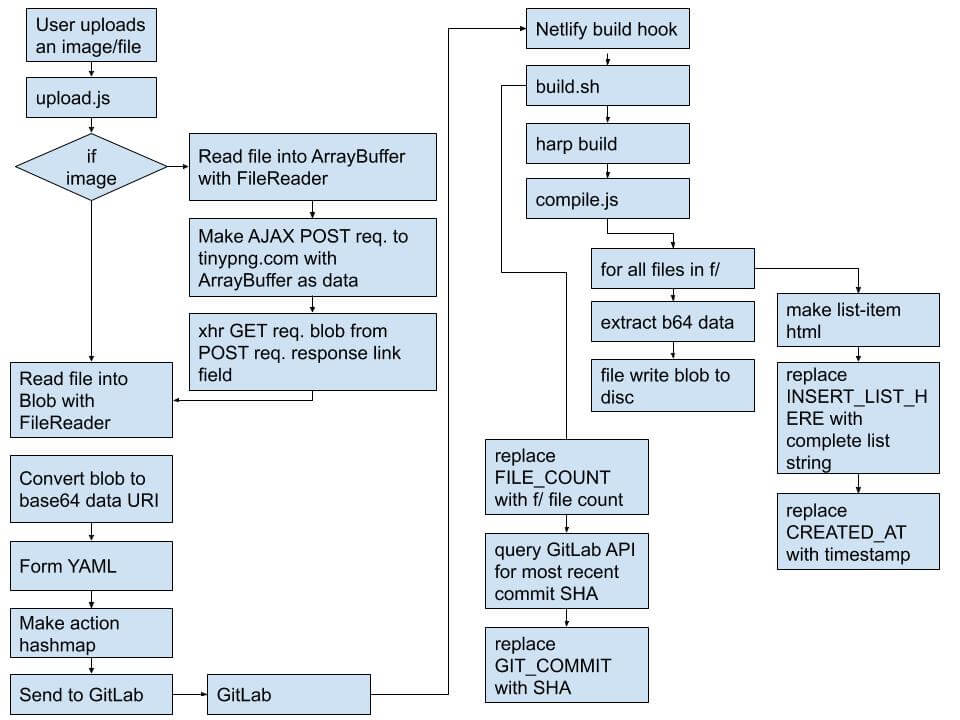
There is a short delay of about 30 seconds between a file uploaded and it being accessible because of the compilation time on Netlify's end.
There are a lot of strings like CREATED_AT, FILE_COUNT & INSERT_LIST_HERE,
these are simply regexable terms used during compile time to replace with
html/some value. For example, https://ftp.cass.si/list shows a list of all
files in order of upload date, this is generated during compilation using the
file data - imagine if this were generated every page load - a lot of overhead.
function getListFileMarkup(files) {
files.sort(function (a, b) {
return b.creationDate - a.creationDate;
});
var listString = "";
files.forEach((file, i) => {
var dateString = ` (${timeago.format(file.creationDate)})`;
var fullFilename = file.name + "." + file.extension;
var markup = `
<div class="file-item">
<p>${fullFilename}</p>
<span>${getFileSizeFromB64(file.data)}kb ${dateString}</span>
<a href="https://ftp.cass.si/${fullFilename}"> › </a>
</div>
`;
listString = listString + markup;
});
return listString;
}
//then INSERT_LIST_HERE replaced with listStringasync/await vs callbacks
First there were callbacks, then Promises and now... async/await 🙏
Ever since ES6 dropped and async/await came with it I've gone from being somewhat distasteful of JS to pretty much loving it, over the last 2 years I've really learned a lot about the language, including stuff like React, Redux etc. Promises are pretty awesome and now I really enjoy writing async code.
So what is async/await? Sounds like a load of technobabble me thinks... Essentially it's syntax sugar for the new Promises object-thingy.
May I present, callback hell:
someFunkyFunc(input, function (result) {
  otherLessFunkyFunc(result, function (dear_lord) {
    thisIsSoNotFunky(dear_lord, function (kill_me) {
      //yeah you can see where this is going...
    });
  });
});
Promises were made to solve this! Instead of having a callback function, functions would return a Promise... this was okay for a bit:
var awsumPromise = new Promise((resolve, reject) => {
  setTimeout(function () {
    resolve("foo");
  }, 300);
});

awsumPromise.then((result) => {
  console.log(`that's a really nice ${result} you have there`);
});
But then the old problems came back...
var promise1 = new Promise((resolve, reject) => ... resolve("foo"))
var promise2 = new Promise((resolve, reject) => ... resolve("bar"))
var promise3 = new Promise((resolve, reject) => ... resolve("baz"))

promise1.then(oh_no => {
  promise2.then(what_are_you_doing => {
    promise3.then(aaaaaAAAAAAAAA => {
        //and so it goes
      })
    })
  })
The main issue here is that promise chains are composed from callback functions, and functions introduce new scopes - if we didn't have these sibling scopes we could share access to previous results.
The promised lands: async/await! 🎉
var promise1 = new Promise((resolve, reject) => ... resolve("foo"))
var promise2 = new Promise((resolve, reject) => ... resolve("bar"))
var promise3 = new Promise((resolve, reject) => ... resolve("baz"))

var foo = await promise1()
var bar = await promise2()
var baz = await promise3()
It's like writing synchronous code, but it's async, awsum. There's so much less noise, very pretty looking, totally no excuse not to write clean code with this super nice syntax in place - one must remember that await can only be in async functions, or wrapped in an AIIFE: Async Immediately Invoked Function Execution:
var doesnt_work = await pwomise()(async () => {
  var happy_days = await pwomise();
})();
Netlify Identities
Previously I had been using a straight GitLab Access Token to authenticate and upload files, but this seemed a bit hacky & I wasn't overly comfortable dishing out keys to friends so they could use my service.
Netlify Identities allows you to authenticate users for things like gated content, site administration etc, and is backed by the GoTrue API. It's basically an authentication microservice with a database - the only part of interest to the developer is the user-facing API.
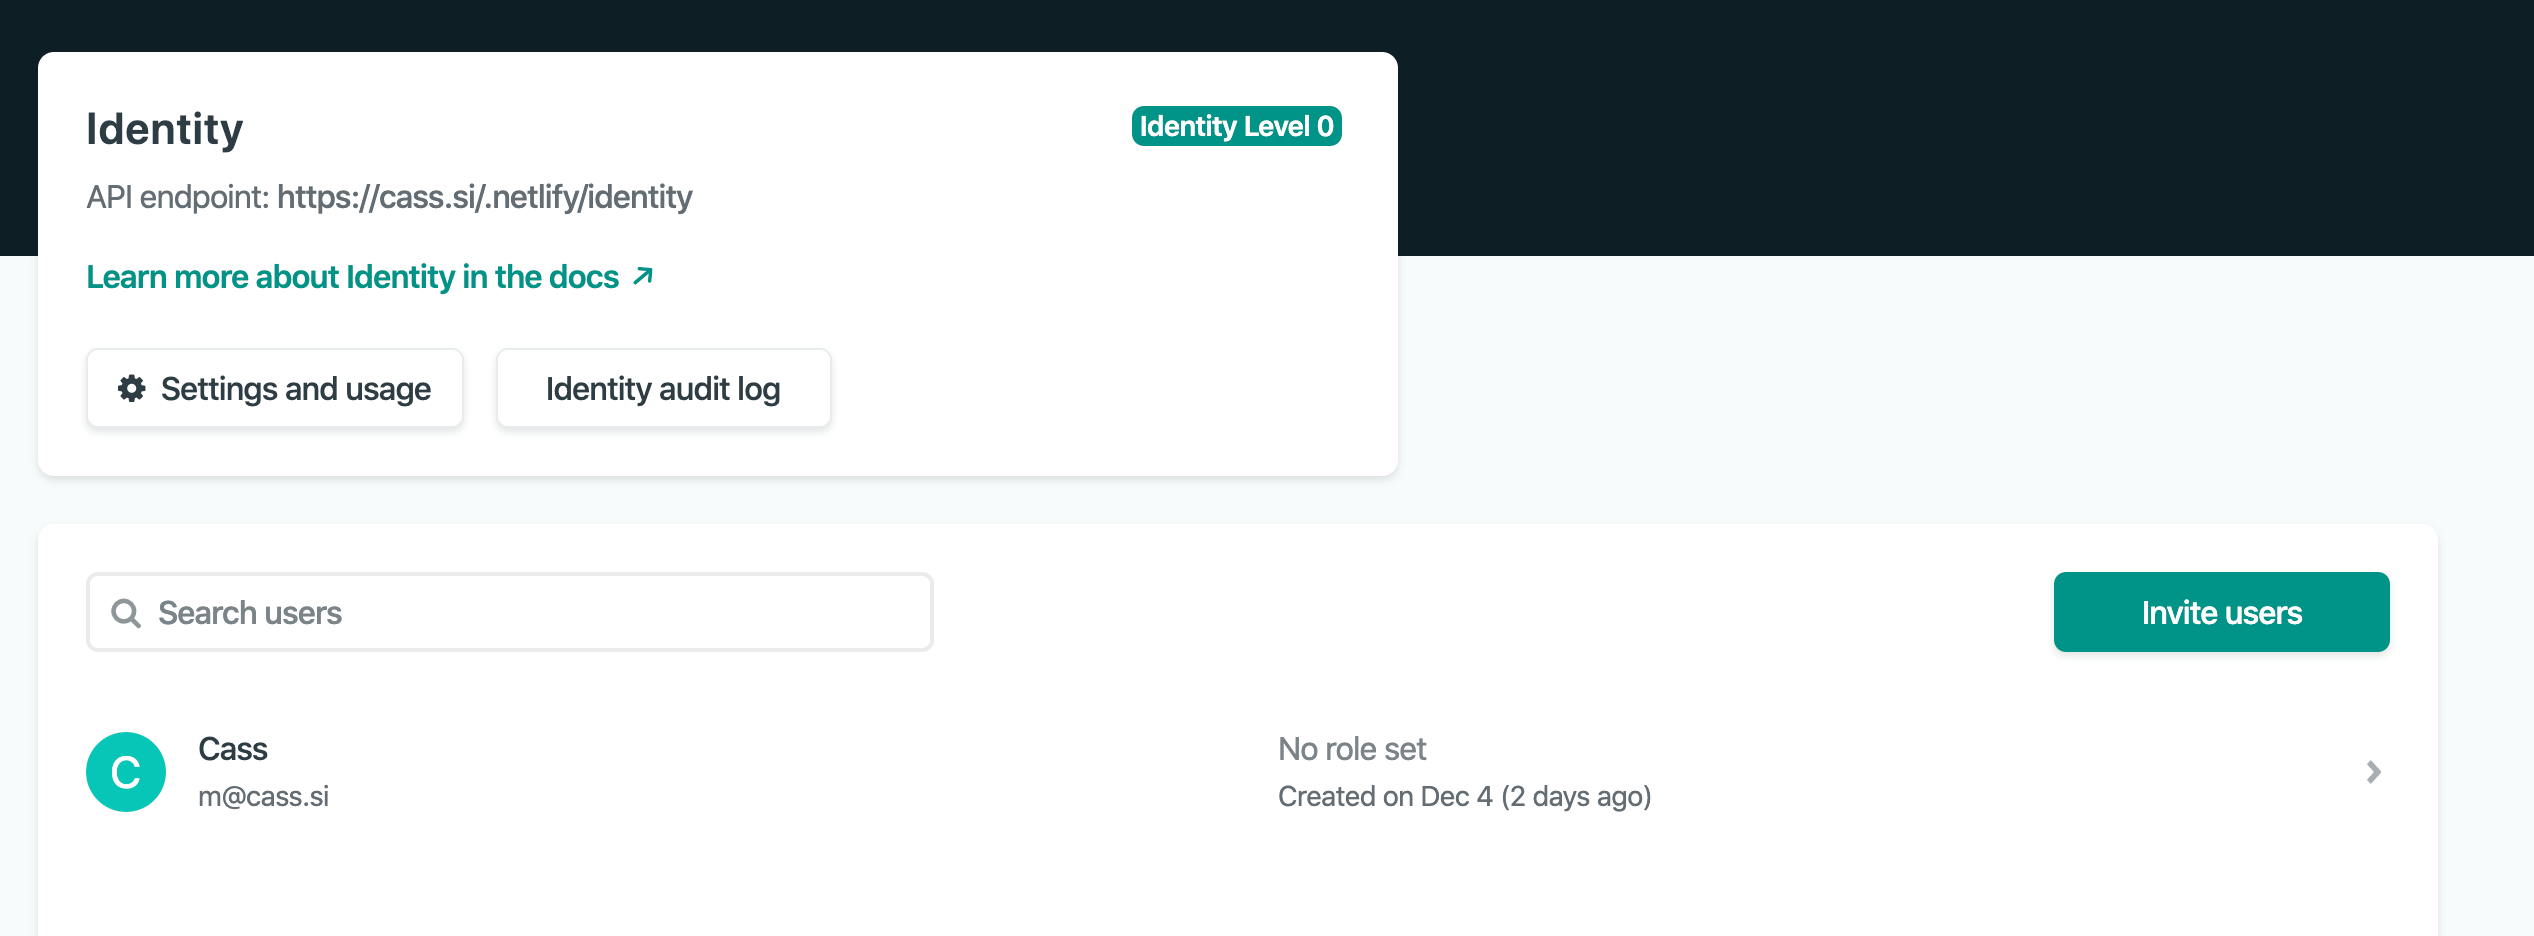
Setting it up is as simple as adding a user on Netlify, downloading the minified gotrue.js file from the gotrue-js repo and setting up an auth object.
var auth = new GoTrue({
  APIUrl: "https://cass.si/.netlify/identity",
  setCookie: true,
});
Unfortunately the Netlify UI has much to be desired and is sort of awkward to
set up a user from after this point. I had to get a recovery token and use that
to get access to the user object, using that I could set a password via the
.update function, like so:
auth.recover(recoveryKey).then((user) => {
  user.update({ password: password });
});
As for actual logging in part, it's as easy as:
//wrap auth in a promise for async/await goodness
async function authUser(username, password) {
  return new Promise((resolve, reject) => {
    auth
      .login(username, password)
      .then((user) => {
        resolve(user);
      })
      .catch((err) => reject(err));
  });
}

//Immediately Invoked Async Arrow Function Expression to allow await at top-level
(async () => {
  user = await authUser("someuser", "somepath"); // returns User object
})();
This is probably the easiest user login I've ever created, it has a super nice and condense API, can definitely see myself doing this more often. (also IIAAFE's are freaking noice)
This service makes use of the GitLab API and so we can leverage GoTrue to store
this token in a user_metadata field, which
strangely uses a key of data
in the update function:
function setUserGitlabToken(user, token) {
  return new Promise((resolve, reject) => {
    user
      .update({ data: { gitlab_token: token } })
      .then((user) => resolve(user))
      .catch((err) => reject(err));
  });
}

(async () => {
  user = await authUser("someuser", "somepath");
  setUserGitlabToken(user, GITLAB_TOKEN);
})();
Harp.js skeleton
We need some content for our site! I've used Harp.js in the past and while it seems quite dead in developement now, it's nice and simple for little pages like this.
Harp serves Jade, Markdown, EJS, CoffeeScript, Sass, LESS and Stylus as HTML, CSS & JavaScript—no configuration necessary.
All I need to do for this part is pass in some markup, write the styles and the
JS handles DOM manipulation for adding UI elements later on. During compilation
other JS files will replace placeholder strings like INSERT_LIST_HERE with the
actual html. While I'm in dev enviroment it looks like this:

The skeleton source is here.
Client side image compression with tinypng.com
Oh man, what fun I had with this, from CORS issues to ArrayBuffers, this part probably took me the longest to make. tinypng has pretty good documentation all things considered and even a few implementations for different languages... all except client-side using HTTPS.
My thoughts: get image, send image to api, get compressed image, continue as normal. Simple right?
Firstly, what actually is an image? When you add a file to an input field it
triggers onchange, we can access the content of this (a
FileList) even via
an event listener:
$("#fileUploadInput").addEventListener("change", (event) => {
  var files = event.target.files; //is a FileList
  files.forEach((file) => {
    //file is a File object
    //File is inherited from Blob
    //https://developer.mozilla.org/en-US/docs/Web/API/File
  });
});
This contains our data, but first it needs to be read in by a FileReader:
let reader = new FileReader();Before I go any further we have to take a look at what kind of data the tinypng API takes, the docs show:
curl --user api:YOUR_API_KEY \
      --data-binary @unoptimized.png -i https://api.tinify.com/shrink
I tried this on my laptop and cURL said it was a POST request in the headers -
it takes Basic HTTP authentifcation in the form api:API_KEY and a
data-binary... whatever that is - and returns an object like this:
{
  "input": {
    "size": 282615,
    "type": "image/png"
  },
  "output": {
    "size": 77598,
    "type": "image/png",
    "width": 580,
    "height": 1034,
    "ratio": 0.2746,
    "url": "https://api.tinify.com/output/tbvcetjky0xtdrb9c4kvc0prur96ha2m"
  }
}
The object returns a link to the compressed file, output.url, so we can grab
that. But first, what the hell is a data-binary in cURL?
From the man page:
--data-binary

(HTTP) This posts data exactly as specified with no extra processing whatsoever.

If you start the data with the letter @, the rest should be a filename. Data is
posted > in a similar manner as -d, --data does, except that newlines and
carriage returns are > > preserved and conversions are never done.

Like -d, --data the default content-type sent to the server is
application/x-www-form-> > urlencoded. If you want the data to be treated as
arbitrary binary data by the server > then set the content-type to
octet-stream: -H "Content-Type: application/octet-stream".
From this we know the content type is an octet-stream and data-binary is an
arbitrary piece of binary data with no extra processing. According to MDN docs
we can read files using FileReader into a "fixed-length raw binary data
buffer" via readAsArrayBuffer, which sounds like what I want.
So the request to the tinypng API should look like:
let reader = new FileReader();
reader.readAsArrayBuffer(file)

var p = new Promise((resolve, reject) => {
  reader.onload = function(e) {
    resolve(e);
  }
})

var fileArrayBuffer = await p;

var result = await $.ajax({
  url: 'https://api.tinify.com/shrink',
  type: 'POST',
  data: fileArrayBuffer,
  processData: false,
  headers: {
    "Authorization": 'Basic ' + btoa('api:API_KEY')},
    "Content-Type": "application/octet-stream",
  },
  success: function(response) {
    return response.output.url
  },
  error: function(xhr, textStatus, errorThrown) {
    console.log(xhr, textStatus, errorThrown)
  }
});
Looks good, then.... this bullshit.

CORS, CORS, so annoying, but has its reasons for existing - to stop requests
from domains that aren't its own accessing resources unless they're down in
the hosts Access-Control-Access-Origin.
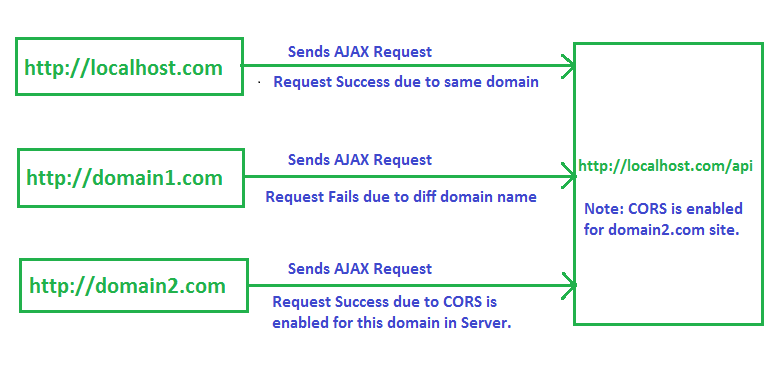
After a bit of searching I came across this Stack Overflow post. It states by prepending the API url with a Heroku URL it'll do some magic to the CORS headers and the request will go through?
CORS Anywhere helps with accessing data from other websites that is normally
forbidden by the same origin policy of web browsers. This is done by proxying
requests to these sites via a server (written in Node.js, in this case).

"To use the API, just prefix the URL with the API URL.". That's really
all of it. So, instead of requesting http://example.com, you will request
https://cors-anywhere.herokuapp.com/http://example.com. CORS Anywhere will
then make the request on behalf of your application, and add CORS headers
to the response so that your web application can process the response.
I'm not entirely sure how this works... but it does,
url: 'https://cors-anywhere.herokuapp.com/https://api.tinify.com/shrink',Now to get the compressed file, apparently AJAX doesn't support downloading
files but xhr does? Weird, anyway (also again with the cors-anywhere):
//get that mfing blob
var getBlob = new Promise((resolve, reject) => {
  var xhr = new XMLHttpRequest();
  xhr.onreadystatechange = function () {
    if (this.readyState == 4 && this.status == 200) {
      resolve(this.response);
    }
  };
  xhr.open("GET", HEROKU_CORS_URL + result.output.url);
  xhr.responseType = "blob";
  xhr.send();
});

return await getBlob;
Woo, a compressed file! Typically tinypng shaves off around 75% of the file size with no noticable change, so definitely a worthwhile addition when you consider how much file size is added when convering to data URI.
Files are later read by another FileReader into their base64 data URIs via
reader.readAsDataURL, this is done so to end up with a flat text file which
can be sent to the GitLab repo.
Packing files into yaml
As I said before, one of the main issues of the previous implementation was the lack of meta-data. Now that I can support multiple users I want to track who uploads what files - incase of abuse or something.
The YAML file schema looks like:
uploader: <string> full_name of uploader account
creationdate: <int> milliseconds since linux epoch
data: >
  "data:image/jpeg;base64,/9j/4AAQSkZJRgABAQAASABI... ..."
This data is used during compilation to generate the file list. I made the
mistake of using \t to indent but apparently YAML uses 2 spaces to indent
resulting in an invalid file during parsing. 😒
GitLab action hashmap
In the previous implementation I used a naive solution of just sending an AJAX request for each file - creating a new commit for each file - this isn't exactly efficient (and it floods my commit graph).
I'm not sure why I didn't see this before but there's a
route
that allows multiple files to be uploaded at once:
POST /projects/:id/repository/commits
It takes a list of "actions", which can be anything from deleting a file to moving it.
{
"actions": [
  {
    "action": "create",
    "file_path": "foo/bar.txt",
    "content": "some content"
  },
  {
    "action": "delete",
    "file_path": "foo/bar2.xml"
  },
  ...
fileToYaml simply forms a string in the same form as the schema I described,
thus the request to the GitLab API looks like:
var actions = [];
files.forEach((file) => {
  actions.push({
    action: "create",
    file_path: `f/${file.name}.yml`,
    content: fileToYaml(file),
  });
});

$.ajax({
  type: "POST",
  url: `${HEROKU_CORS_URL}https://gitlab.com/api/v4/projects/${PROJECT_ID}/repository/commits`,
  dataType: "json",
  contentType: "application/json; charset=UTF-8",
  data: JSON.stringify({
    branch: "ftp",
    commit_message: `FTP :: Uploading ${files.length} file(s)`,
    actions: actions,
  }),
  beforeSend: function (xhr) {
    xhr.setRequestHeader(
      "PRIVATE-TOKEN",
      auth.currentUser().user_metadata.gitlab_token
    );
  },
  success: function (response) {
    console.log(response);
  },
  error: function (xhr, textStatus, errorThrown) {
    console.log(xhr, textStatus, errorThrown);
  },
});
Building
Time to bring it all together. When a commit is sent to GitLab a Netlify build
hook gets triggered starting a deployment, this deployement uses a build.sh
file to carry out actions and serves all content out of the _site directory.
#!/bin/sh
rm -rf _site/
mkdir _site/

#compile the skeleton site
harp compile skeleton/ _site/

#convert all yml files in ./f to their blob
#generate the list string and insert into ./_site/list.html
node compile.js

#get all files (not hidden), get number of lines (files), format as 1,234
#replace FILECOUNT in ./_site/index.html with this value
FILECOUNT=$(find ./f -not -path '*/\.*' -type f | wc -l | awk '{ printf("%'"'"'d\n",$1); }')
sed -i -e "s/FILECOUNT/$FILECOUNT/g" ./_site/index.html

#get most recent commit SHA (the one that triggered this deployment)
#replace GITCOMMIT in ./_site/index.html with this value
COMMIT=$(curl --silent --header "PRIVATE-TOKEN: $GITLAB_API_KEY" "https://gitlab.com/api/v4/projects/13261952/repository/commits/ftp" | jq '.short_id' | tr -d \")
sed -i -e "s/GITCOMMIT/$COMMIT/g" ./_site/index.html

exit 0
The only real file of interest here is compile.js which simply goes over all
files in f/, parses the YAML, extracts the data URI and converts it into a
blob writing it to ./_site.
function writeFileToDisk(file) {
  var dir = __dirname + "/_site";
  fs.writeFile(
    `${dir}/${file.name}.${file.extension}`,
    file.data,
    "base64",
    function (err) {
      if (err) {
        console.log(err);
      }
      console.log(`Wrote ${file.name} to disk.`);
    }
  );
}
Conclusion
That's most of it covered. I will admit it's a bit of an awkward way to do file hosting, but it's free and was fun to work on - also a bit of a way to flex my programming skills on 18 year old self.
I added a few other features such as a recovery page, resetting tokens/password after logging in an a method of previewing & deleting files from the file list page. You can view all that stuff in the source. Feel free to fork and do whatever you like :)
† I can feel myself saying that again in another 2 years...